Part Nine - Forests
Posted 26 Jan 2022
Posted 26 Jan 2022
This post is the ninth part of a tutorial series that teaches how to create fantasy maps in Inkscape. This part deals with creating rivers.
Here are the other sections of the tutorial.
Now onto Part Nine!
There are a couple of styles you can use for forests, one being the ‘green blob’, and the other using individual trees. I’ve always been a fan of the individual tree, even though it’s a bit harder on the PC, so that’s the style I’m going with here. We’ll create a tree, use some Inkscape tricks to introduce some variance in the colouring, then we’ll create a bunch of clones to place on our map.
If you’d rather make the ‘blob’, you can of course do that instead. Just draw a blob with the Bezier or Pencil tool, then add some squiggly lines to introduce texture. You can add some shading by drawing random shapes with slightly different hues from the main colour, and blurring these to blend.
Before we dive in, create a layer called ‘Forests’ above your ‘Mountains’ layer.
We’re going to start by making a single tree. Click on the Stars and Polygons tool. Make sure Polygon is selected and the number of corners is set to 3, with the Rounded and Randomised boxes both at zero. Hold the Ctrl key and drag on the canvas to create a triangle making sure the bottom part is level. Click Path > Object to Path. Using the height and width boxes in the top toolbar, change the dimensions of the triangle to 40px high and 20px wide.
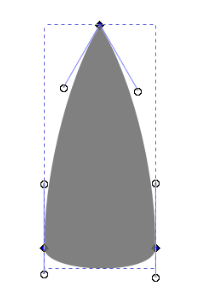
Activate the Node tool. Grab the left side of the triangle about two-thirds of the way up, and gentle pull outwards so that the side curves. Do the same with the right side.
Now grab the bottom of the triangle and gently pull down to give a curved shape. Hold down the Ctrl key and adjust the node handles at the bottom left and right until they’re straight (the Ctrl key will constrain how the handles move). This will give a curve at the bottom corners, rather than a point. You should end up with something like this…
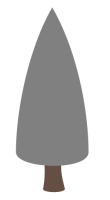
Click on the rectangle tool and draw a small rectangle that will serve as the trunk (approx. 6px wide and 10px high). Convert to a path via Path > Object to Path. With the node tool, drag down slightly on the bottom of the rectangle to give a curved base. Then, drag inwards slightly on the left and right sides. so that the trunk curves, instead of having straight lines. Use the node handles again to make the bottom corners rounded instead of sharp.
Roughly position the rectangle at the bottom of the tree, and centre it using the Align and
Distribute panel. Give it a colour of #654f45ff (same brown shade used in the mountains and
coastline stroke). Finally, press PageDown to lower the trunk below the triangle. You should
have something like this…
Click the triangular top part of the tree again, and give it a stroke of 2px. Make the stroke the same colour as the trunk, and on the Stroke Style tab, make sure the ‘Join’ and ‘Cap’ types are both set to Rounded.
We’re going to add a little hatching on the tree, same as we did with the mountains. Click on the Bezier tool, and set the Shape type to ‘Triangle In’ via the toolbar at the top left of the screen. Set the Scale value to 0.20.
Draw a line that begins near the bottom left edge of the tree and extends about half way across. The fatter left side of the line should overlap the stroke of the triangle shape.
With the node tool, pull down slightly on the line so that it curves. The curve should roughly match the curve at the bottom of the triangle shape.
Draw another line at the left hand side near the top of the tree. This one will be very short. Adjust the scale value of the triangle shape if it feels too ‘fat’ in proportion to its length.
Now select both lines and click Extensions > Generate from Path > Interpolate. Turn on Live Preview and try a value around 10 - 15 for the ‘Interpolation Steps’ box, and see how that looks. I decided on a value of 15 interpolation steps. I also set the Interpolation Method value to ‘2’, as that generated a cleaner looking shape.
Click apply when you’re happy with how the interpolation looks, then close the box.
Ungroup the newly created hatching lines, and manually position them so that the fat ends sit on top of the stroke of the triangle shape. Adjust the width of a few of the lines to break up the ‘manufactured’ look.
Here’s what I have now…
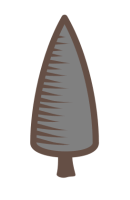
You’ll doubtless have noticed my tree is a rather drab shade of grey. We’re coming to that!
We’re going to have quite a number of trees on the map, and nothing screams ‘vector’ more than a bunch of same-coloured objects. So we want to introduce some variance in the colouring. But… our trees will be clones, which inherit their properties from the parent object, so how can we do that? Fortunately, there is a way!
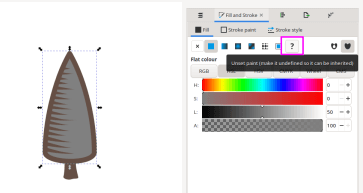
Click your triangle shape once to select it, then go to the Fill and Stroke panel. Click on the Fill tab, and you’ll see the fill colour that you have currently. Look at the row of icons at the top of the panel. Near the end of the first block, there’s an icon with a Question Mark. It says ‘Unset paint…’ when you hover over it. Click this icon and your tree will turn black. You haven’t actually set the colour to black. You’ve ‘unset’ the fill colour, which allows the shape to have colour applied from elsewhere. All will become clear shortly!
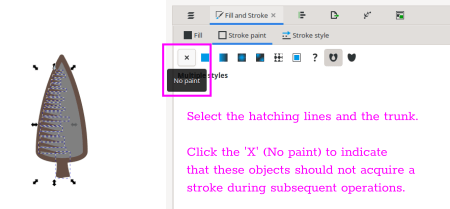
Before we create the clones, there’s one more preparation step. Drag the mouse over all the hatching lines to select them. Hold shift and click on the tree trunk to select it too (do NOT select the main triangular part of the tree). Go to the Stroke Paint tab on the Fill and Stroke panel. Now click the ‘X’ icon at the left to indicate that these objects have no stroke (do this even though these objects don’t currently have a stroke).
If you don’t explicitly tell Inkscape they should not have a stroke, they may ‘inherit’ one during the cloning procedure. Don’t worry about whether this makes sense to you or not. Just click the ‘X’ to indicate No Stroke!
With that done, drag the mouse over the entire tree to select all the parts, then group everything (Ctrl + G). We’re now ready to make some clones.
Drag your tree to the top of your map, and place it beside the mountain original symbols you made earlier. This is just so that we don’t lose track of the original when we create the clones.
Click on Edit > Clones > Create Tiled Clones.
We used tiled clones previously to make the mountains, but on that occasion we left all settings at the default. This time, we’re going to change some of the options to make our tree clones a little more interesting.
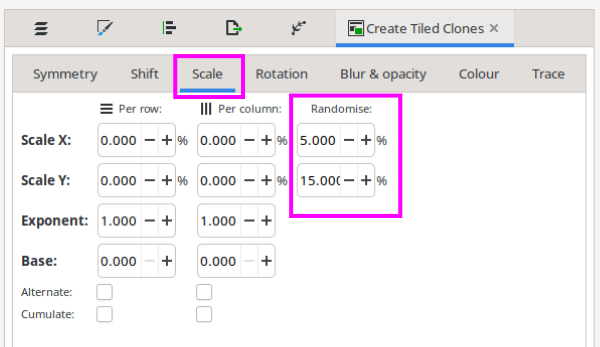
On the Tiled Clones Panel, click on the tab headed ‘Scale’. Using this tab, we can vary the sizing of our trees a little, which helps to break up the ‘sameness’ of them. Don’t go crazy with the numbers, or you’ll end up with trees larger than your mountains! They would also have varying stroke thickness, which detracts from our attempts to have relatively consistent line art.
In the row titled ‘Scale X’, put a value of 5.0 in the ‘Randomise’ box at the right. In the row titled ‘Scale Y’, put a value of 15.0 in the ‘Randomise’ box.
These values will give us a little variation in sizes without going over the top.
Now click on the ‘Colour’ tab, second from the end.
There’s a little colour swatch near the top of this panel labelled ‘Initial colour’. Click
on the colour and a pop-up window will open where you can select a new colour. In the box
at the bottom labelled ‘RGBA’, enter the value d7d5abff. This is a nice subtle colour that
will match our existing colour scheme quite well.
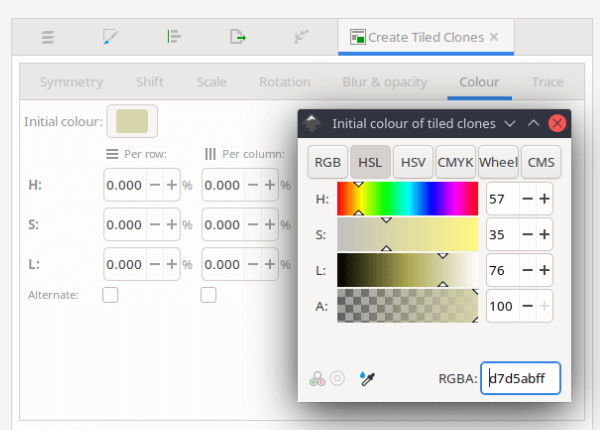
Once the colour is set, we want to input some values in the ‘Randomise’ boxes too. There are three rows: H(ue), S(aturation), and L(ightness). We want fairly low values for each of these, especially Hue, or we’ll end up with neon pink trees!
In the Randomise boxes, enter the following values:
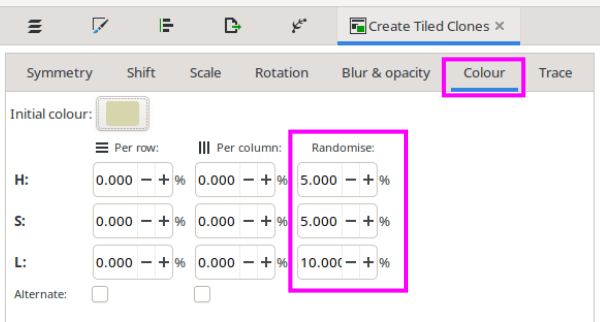
With that done, return to the first tab (‘Symmetry’) on the Tiled Clones panel and input some numbers into the ‘Rows, Columns’ boxes, same as we did with the mountains.
You’ll have to give some thought on how many trees you’re going to need, though it’s likely to be quite a high number. I would suggest creating a new layer for each forest area (label them, for example, ‘Forest Top Left’, ‘Forest Bottom Right’ etc.) Copy the tree symbol with Ctrl + C and paste a new version into each layer with Ctrl + V. You can then run separate Tiled Clone operations on each new tree. Doing this also allows you to change the base colour on the clones, if you want, to introduce a bit of regional variation in your forests (so, for example, northern forests could be a subtle blue-green, where southern forests are a brighter purer green).
When you’re finished with a layer, lock it and hide it. Generally speaking, the less Inkscape has to show on screen, the easier it manages. Hide everything that isn’t essential. You might want to hide your mountains but turn your ‘Plan’ layer on, so that you have a rough idea of where to put things. The plan layer has significantly less detail and will be easier to render.
I’m going to create 250 clones for my first forest, so I’ll put 25 and 10 into the Row/Column boxes. You can enter your own chosen values.
After you click create, you’ll see a whole bunch of trees with slight variations in sizes and colours. Lovely!
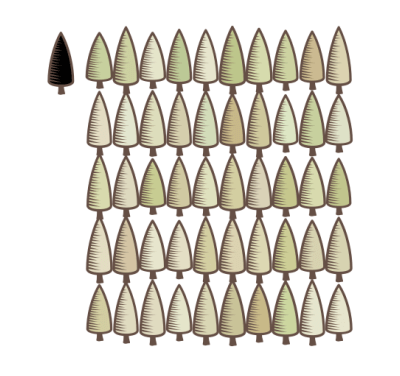
Now all you have to do is place these on your map. Turn on the ‘Plan’ layer, if it’s not on already, and begin dropping down some trees in the areas you marked off for forests.
You can pack your trees tightly or loosely. A dense forest will require a lot of clones and it’s time consuming to position them, so be warned that you’re giving yourself a big job. The effect is nice, but you may not feel it’s worth the time or the (potential) strain on your PC.
Loosely wooded areas can look great too. Maps aren’t 100% representative of the real world so forests don’t need to be dense. You can simply label the area as ‘Forest of [Your Chosen Name]’ and it will be understood that this is a heavily wooded area. Either option works.
If you’re packing your trees tightly, you will almost certainly run into the stacking issue, as explained in the Mountains tutorial. You can fix this by selecting all the trees and running Extensions > Arrange > Restack (try ‘Top to Bottom’ as the ‘Direction’, ‘Left’ as the Horizontal option, and ‘Bottom’ as the vertical option). Remember to be patient as this tool can take a while.
As mentioned above, some older PCs may struggle a bit here, so save often! It wouldn’t hurt to create backup copies when you complete each section (and yes, I know we have autosave, but you can never have too many copies!) On the File menu, click Save A Copy… and give the backup a new name.
When your forests are complete, lock the layers and save.
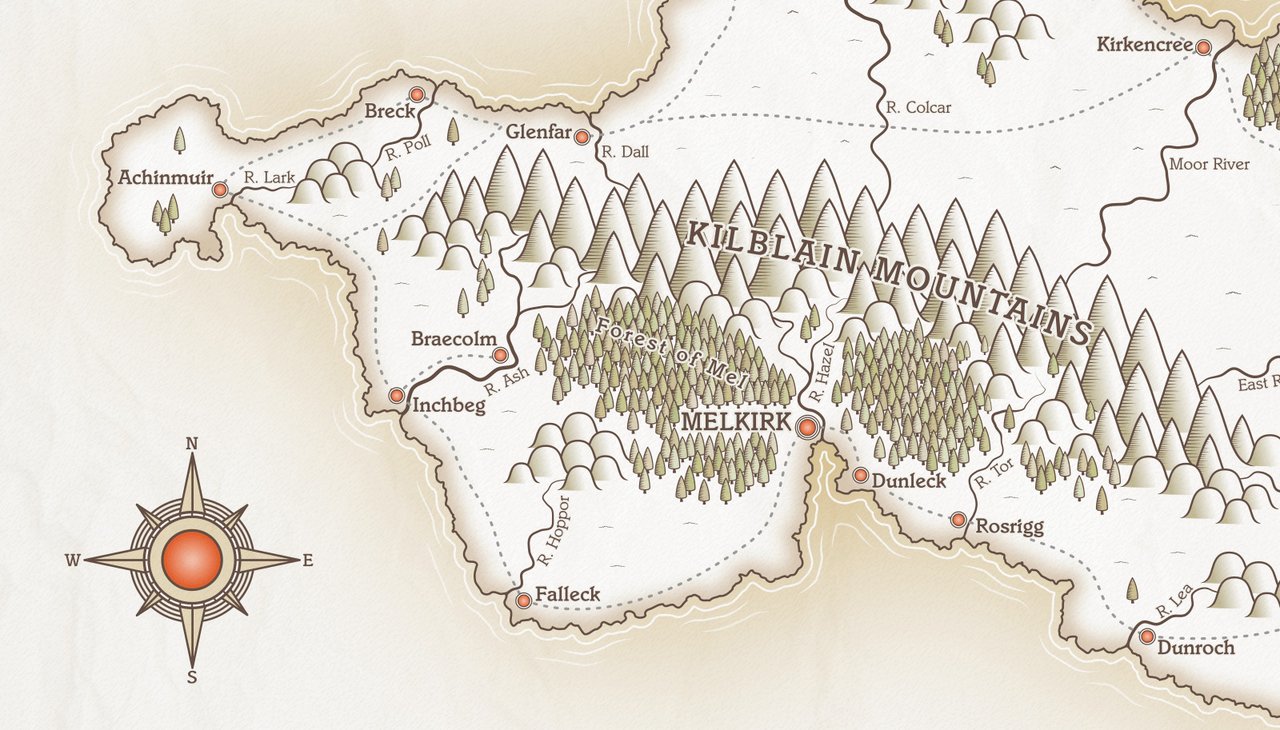
Here’s my latest work-in-progress after positioning the trees. I used a total of 544 tree clones on this map. I will probably move a few of the scattered trees before I’m done, as I might need more space once I start labelling, but the bulk of the trees will remain where they are.
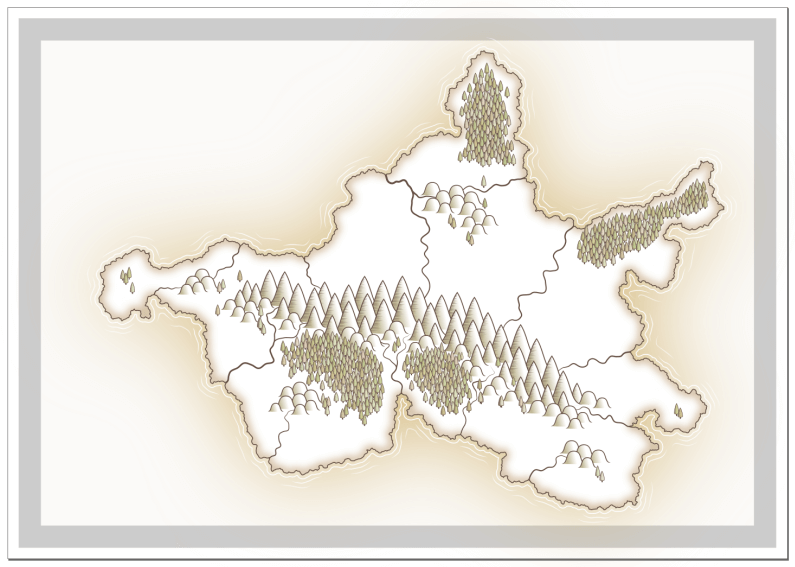
In this section, we made an individual tree, then set up some options to vary the size and colour within Inkscape’s Tiled Clones function. In the next section, we’ll begin creating some settlements and labelling our map.
Tags:
inkscape mapmaking map-tutorial