Part Four - Coastline Ripples
Posted 11 Jan 2022
Posted 11 Jan 2022
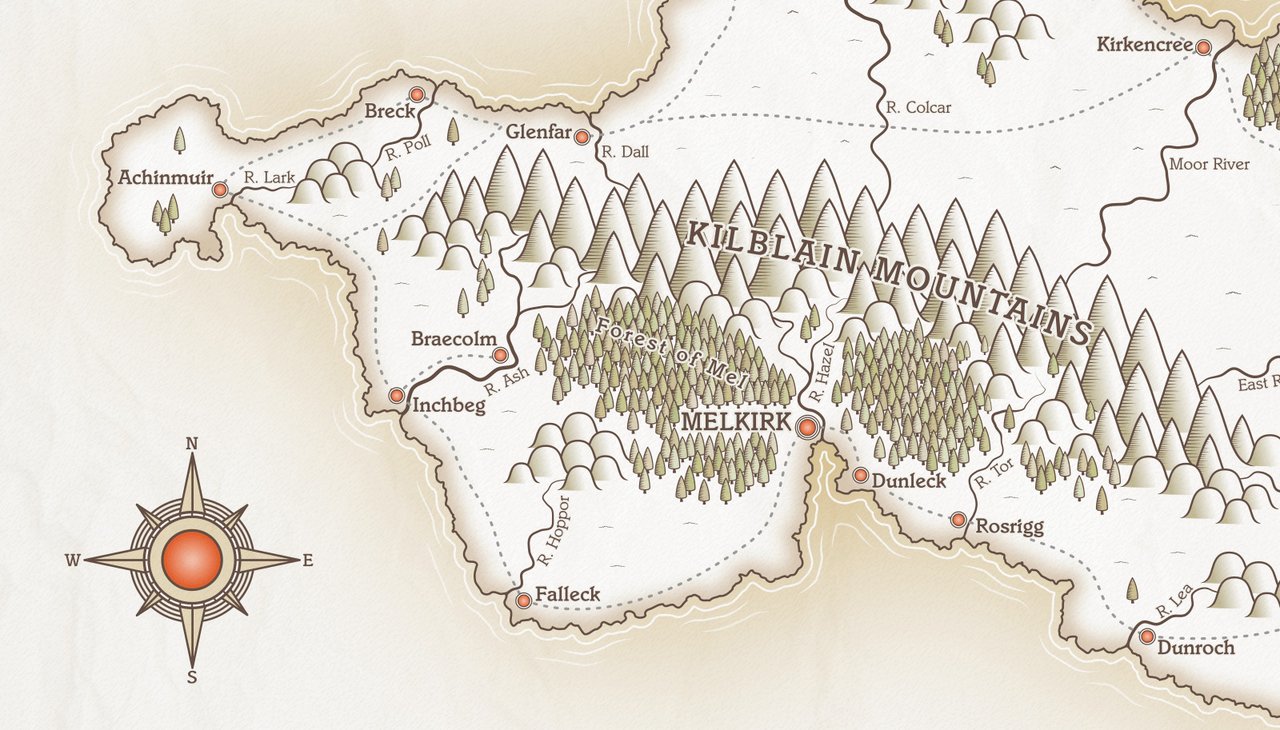
This post is the fourth part of a tutorial series that teaches how to create fantasy maps in Inkscape. This part deals with creating ripples around the coast to represent waves in shallow water.
Here are the other sections of the tutorial.
Now onto Part Four!
Ripples are a nice little effect to give the impression of shallow waves around the coastline, and Inkscape has some great tools to help make them. We’ll create three sets of ripples each fading and breaking up as we move further away from the coastline.
Start by creating a new layer called ‘Ripples’. Now, temporarily unlock the ‘Island Shape’ layer and make a duplicate of the island. Move this duplicate to the new ‘Ripples’ layer. Relock the ‘Island Shape’ layer when you’re done.
Back on the ‘Ripples’ layer, click the island shape, remove the fill colour, and give it a dark coloured stroke, 4px wide. This will be our first ripple. We’ll change the colour later to make it blend into the background, but for now it’s important that we can see what we’re doing.
We’re going to use the ‘Dynamic Offset’ tool to grow our ripple but we need to simplify it a little before we start, to cut down on the number of nodes. Click the ripple once to select, then press Ctrl + L three times to run the Simplification operation. Next, go to Path > Dynamic Offset. Press N to activate the Node tool, and look for a little diamond node on the ripple. It’s usually at the top of the path around the highest point. With the node tool, grab the diamond node and pull it upwards a little and you’ll see the stroke expanding outwards.
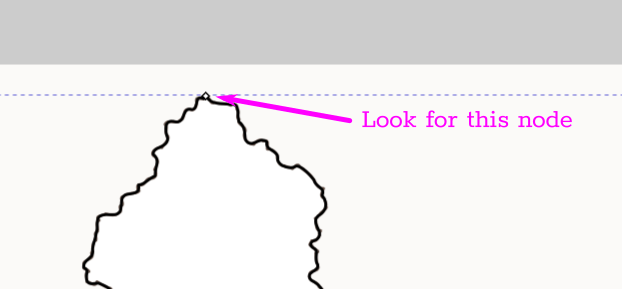
You’ll have to use your judgement on how much to expand the ripple. I’d suggest aiming for a gap that would be in the region of 20px.
Here’s a screenshot of my first ripple after running Dynamic Offset. And as you can see, we have a little problem.
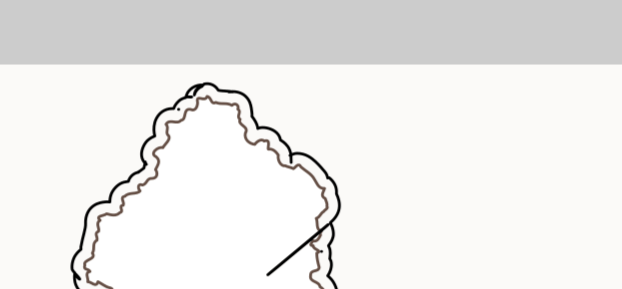
When a path is complex with many nodes that are close or overlapping each other, Dynamic Offset can introduce some problem artefacts. Simplifying the path helps greatly with this, but unless our coastline is significantly smoothed out, there are still going to be unwanted areas that we’ll need to clean up manually.
Before we can work on the clean up, we need to ‘finalise’ the Dynamic Offset. You can do this by clicking Path > Object to Path. Once you’ve run this command, the single diamond node is no longer available and you can’t adjust the offset any further. The ripple will turn into an ordinary path with regular nodes.
Now we can run the ‘Break Apart’ command to split the paths into separate objects, and this will help tremendously in cleaning up our unwanted artefacts.
Using the keyboard, type Ctrl + Shift + K (or Path > Break Apart). Running this command will give us the main ripple around the coast plus a whole bunch of artefact objects. Both the ripple and all the artefacts will be selected immediately after running the command, so hold the Shift key and click on the main ripple stroke. This will deselect it, but will leave all the other objects still selected. You can then press the Delete key to get rid of them all at once. (If you accidentally deselect everything after running Break Apart, just drag the mouse over the entire map to select everything again, deselect the ripple stroke, then hit delete.)
Getting rid of the extra paths has helped enormously in cleaning up our ripple, but there are probably still going to be a few oddities that we’ll need to fix manually.
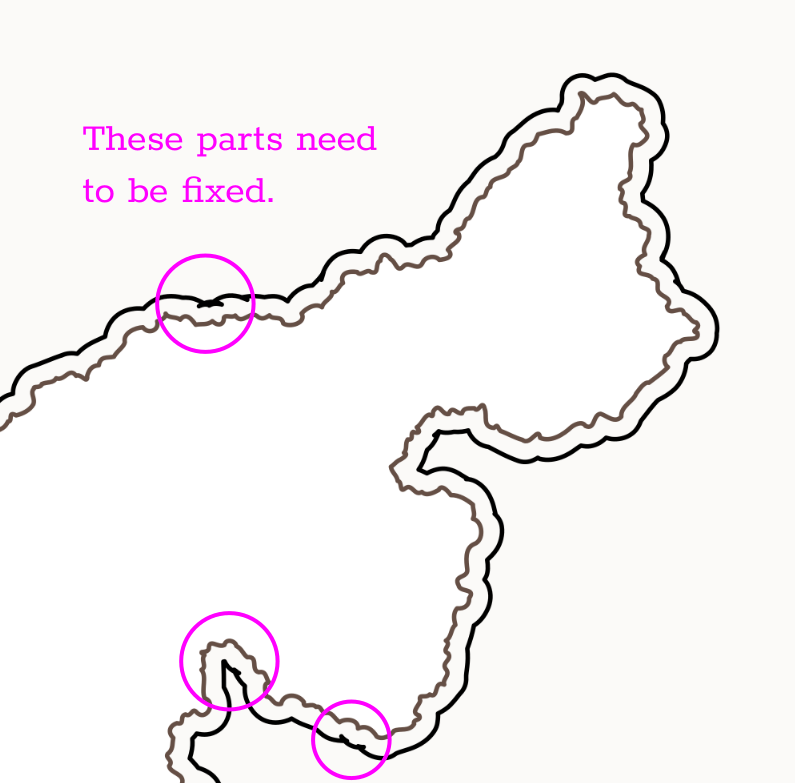
I would suggest running the Simplification tool again which should fix most of the issues. Press Ctrl + L a couple of times to smooth things out. There are likely still going to be a few problem areas left however, so go around the coastline and look for any parts where the stroke overlaps itself or doesn’t look quite right. You’re looking for bits similar to what’s shown in the screenshot above. Delete any surplus nodes and smooth out the coast. We did something very similar in Part Two after we ran the Fractalize extension, so you know what to do.
Don’t spend a great deal of time tweaking and fixing nodes. Just drag the mouse over all the problem nodes to select, and hit the delete key. Smooth out the path with the handles of nearby nodes if it deforms too much after the deletion. So long as the path roughly follows the island shape, it’ll be fine. I was able to go around the coast and clean up in less than two minutes.
We now have our first ripple in place, so save your work before we go any further.
With the first ripple selected, hit Ctrl + D to duplicate. Change the stroke colour to red for now, just to distinguish it from the first. We’re going to repeat the Dynamic Offset procedure with this second ripple, so go to Path > Dynamic Offset and drag the diamond node out a little further. You should aim to leave the same amount of space between the second and first ripple as you did between the first ripple and the island coastline. When you’re happy with where the second ripple is positioned, go to Path > Object to Path to finalise it.
We now need to run our clean-up operation again. Press Ctrl + Shift + K to break the path apart. Hold shift and deselect the main ripple, then hit Delete to get rid of the artefacts. Now press Ctrl + L a couple of times to simplify, then go around the coastline looking for any oddities. Delete and tidy up. Hopefully the second ripple should have fewer issues than the first, as the initial path was a little smoother this time.
We’re going to do something a little different with the second and third ripples, to simulate a ‘receding waves’ effect, but before we start on that, we need to create the third ripple. Copy the steps in the above two paragraphs to create your third ripple. Start by duplicating the second ripple, run Dynamic Offset to expand the path, then Object to Path, Break Apart, delete the surplus artefacts, Simplify, then manually clean up. You should end up with something similar to the screenshot below.
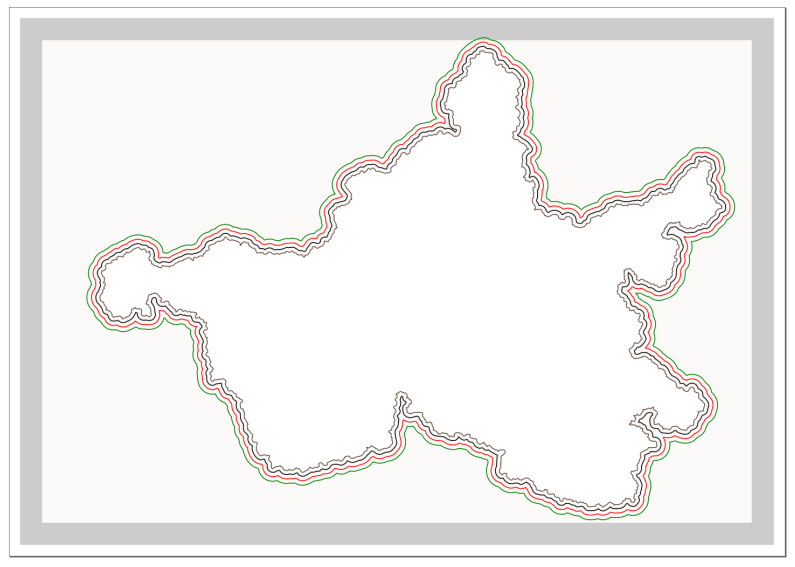
We’re going to split the outer ripples into separate objects to give them a more dynamic feel. To do this, we’ll create a tapered line, then use the Pattern Along Path effect to place repeating copies of the taper along the entire ripple. We’ll start by creating the tapered line.
Using the Bezier tool, draw a horizontal line. Hold the Ctrl key so that your line is perfectly straight. Set the stroke width to 4px and the line length to about 150px (you can set the length via the Width box in the toolbar at the top of the screen).
With the line selected (important!), go to Path > Path Effects (it’s down near the bottom) and the Path Effects panel will open at the right hand side (next to your Layers/Fill and Stroke panels). There’s a search box at the top. Start to type Taper stroke and Inkscape will filter through the various effects. Click on Taper Stroke when it shows and the options for this effect will be displayed.
You can accept the default settings (assuming you’ve never changed the defaults), or, if you prefer, you can select the Node tool and drag the taper nodes a little towards the centre to make the taper effect ’longer’. Here’s my tapered line.

When you’re happy with how the ’taper’ looks, go to Path > Object to Path to ‘finalise’ the effect. This will convert your line to a path. Inkscape will likely remove the fill and give the object a stroke. We want it the other way around. Remove the stroke and give the tapered line a fill (give it a dark colour for now, but we’ll change this later.)
There are two methods of applying a pattern along a path in Inkscape. There’s one option on the Extensions menu and there’s also a Live Path Effect. I’ve occasionally had problems with the Live Path Effect, where it just doesn’t work correctly. Sometimes one single copy of the ‘pattern’ will show, but it’s hit and miss whether it will show repeating copies, which sorta defeats the purpose of a ‘pattern along a path’! At a guess, it struggles with complex paths like we have here. I don’t know what the issue is, but I’m sure the developers will fix it in time. You’re welcome to experiment with the Live Path Effect and see if it works for you, but for the purposes of the tutorial, I’m going with the option on the Extensions menu.
We’ll need two copies of our tapered line, one for each ripple, so duplicate the taper and drag the second copy over a bit so that you can see them both.
Click one copy of the tapered line, hold Shift, then click your second (middle) ripple, so that both are selected. Click on Extensions > Generate from Path > Pattern Along Path. A pop-up window will open where you can set some options. You can also click the ‘Live Preview’ button to see what your pattern will look like. Set the following options:
I’ve attached a screenshot showing the results I’m getting with the above settings (I’ve changed the ripple colour to light grey and the tapered ‘pattern’ colour to pink so that you can see them clearly). Inkscape has taken our tapered line and repeated it all the way along the ripple, with some spacing in between each copy.
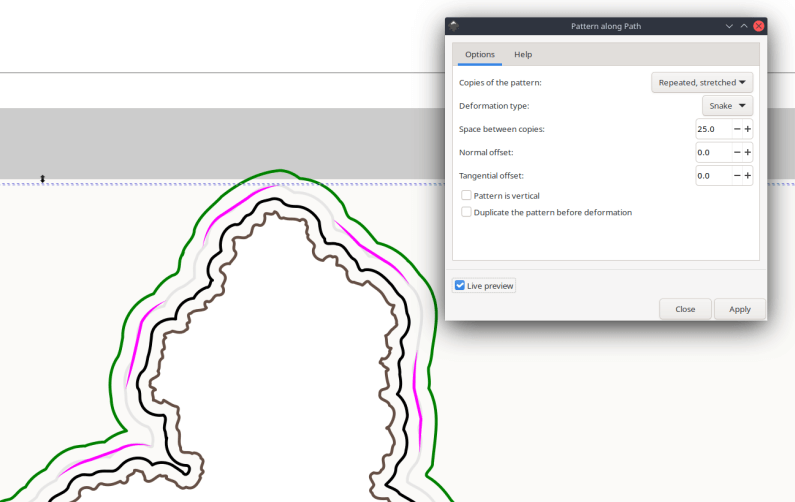
When you’re satisfied with what you see, click Apply and close the Pattern Along Path options box.
We no longer need our second ripple line, so click it once then hit the Delete key. This will leave us with the tapered objects flowing around the coastline of the island.
Repeat the above steps for the third ripple using the second copy of the tapered line (notice the first copy has disappeared, as it was used by the pattern effect). Click your third ripple, hold shift, and click the other tapered line, then once again go to Extensions > Generate from Path > Pattern Along Path.
Use the same settings again, except for the ‘Space between copies’ box. This time, set the spacing to 50 (you can adjust to suit, depending what value you put in the first time). We want the tapers in this outer ripple to be further apart. I would also suggest trying a few values in the ‘Tangential offset’ box. This pushes the ‘start’ point of your pattern further along, which can help ensure your tapered lines aren’t parallel with each other. I put a value of 50 in both the Space and the Tangential boxes, and that worked pretty well.
Click Apply when you’re happy with the results, and close the options box. Finally, delete the third ripple line, leaving only the broken-up taper pattern.
Take a moment here to look over the patterns you just created to see if any of them are looking quite jagged. Although our tapered lines had smooth nodes in the middle part, the pattern along path extension converts them to corner nodes, which can leave them looking sharp where we want them to be curved. Highlight any problem nodes and change the node type to ‘smooth’. Alternatively, use the node tool to tweak the shape of each tapered path to smooth off the sharp bits a little. You don’t have to fix every single taper. Just tweak anything that looks particularly jaggy. Sometimes you get little glitches where there may have been tight ‘corners’ or inlets in your coastline, and the tapered line pattern is a little distorted. Fix anything that catches your eye, so the overall effect is of smooth curves.

We’re almost done with our ripples. The final step is to set their colour.
Cast your mind back to the previous tutorial, where we created a very blurry version of our island in the ‘Sea Blur’ layer, then we hid that layer to avoid slowing Inkscape to a crawl. Zoom out a little so you can see your whole map, then turn on the Sea Blur layer.
Now select your innermost ripple. This one is still a stroke. Change the colour of the stroke to white (#ffffffff).
Now select both the second and third ripples - the ones where we added the tapered pattern. These ripple lines contain filled objects, so set their fill colour to white and they should NOT have a stroke.
The white ripples should stand out nicely against the sea blur, fading into the background as the blur fades. If you feel they’re just a little too prominent, lower the opacity. For example, leave the first (innermost) ripple at 100% opacity, set the second one to 85%, and the third (outermost) ripple to 60% opacity. Adjust these numbers to your preference.
Here’s a screenshot of my work-in-progress after creating the ripples. All layers are turned on here. The ripples are subtle but they add a nice effect to emphasise the coastlines.
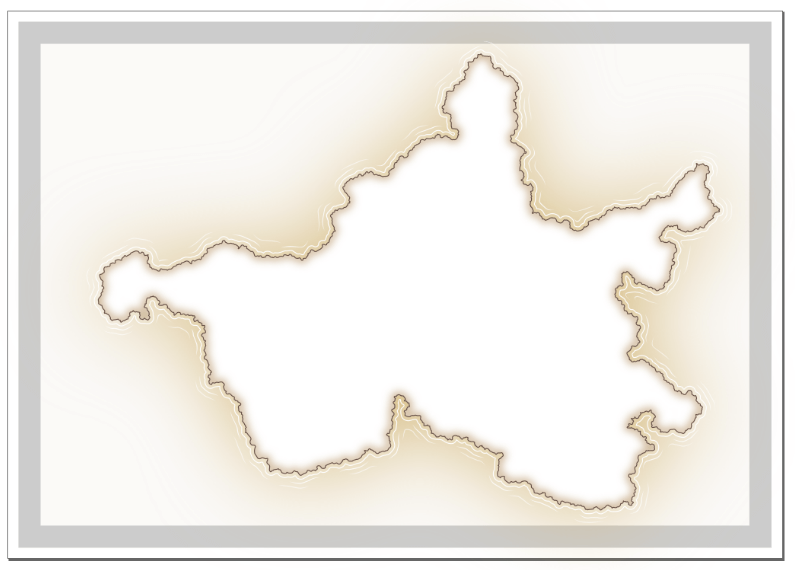
In this section, we created a fading ripple effect around the coastline to give the impression of waves in shallow water. In Part Five, we’ll plan the locations of our main geographical features.
Tags:
inkscape mapmaking map-tutorial